> For the complete documentation index, see [llms.txt](https://docs.openmind.com/llms.txt). Markdown versions of documentation pages are available by appending `.md` to page URLs; this page is available as [Markdown](https://docs.openmind.com/simulators/cloud-isaac-sim.md).
# Cloud Isaac Sim
Learn how to run cloud Isaac Sim integrated with OM1
### Cloud Isaac Sim Developer Walkthrough
Cloud Isaac Sim enables you to run robot simulations on managed cloud infrastructure, fully integrated with OM1. One of the biggest challenges in robotics development is that the robot isn't always available when you need it — someone else may be using it, you may be working remotely, or you may just want to validate an idea before deploying to real hardware. The Cloud Simulator lets you go from zero setup to an autonomous robot in a few minutes, entirely from your browser.
This guide has two parts:
* [**Part 1 — Autonomy in the Portal**](#part-1-autonomy-in-the-portal): launch a simulated robot, build a map with SLAM, create an autonomous patrol, monitor it remotely, and configure autonomous charging — no code required.
* [**Part 2 — Connecting OM1**](#part-2-connecting-om1): run the OM1 runtime against your cloud simulator instance, either in the cloud or from your local machine.
### Prerequisites
* OpenMind Portal account on **Builder plan** or higher (required for Cloud Simulator access)
* API key (found in your portal)
* OM1 codebase built (`make build`) — only needed for [Part 2](#part-2-connecting-om1)
### Cost & Billing
Cloud Simulator usage is billed in OMCU (OpenMind Compute Units). Billing begins as soon as an instance is **allocated** and stops only when the instance has finished shutting down. Ensure your account has sufficient balance before launching.
A **Builder plan** or higher is required to access the Cloud Simulator. Check your OMCU balance and plan in the [OpenMind Portal](https://portal.openmind.com) dashboard before starting.
Two things to know before you launch:
* **You cannot cancel a launch mid-provisioning.** Provisioning takes 10–15 minutes and billing starts at allocation, launching commits you to roughly a quarter hour of billed time even if you immediately change your mind.
* **Idle instances shut themselves down after 10 minutes.** A running instance auto-shuts down after 10 minutes unless you enable the **Persistent connection** toggle on the instance card. This limits runaway cost, but it also means an instance can disappear mid-task — enable the toggle before starting long-running work such as SLAM mapping or a patrol.
Once an instance is running, its card shows a live **OMCU used** counter so you can track spend without leaving the page.
### Part 1 — Autonomy in the Portal
Everything in this part runs from the browser. You'll launch a simulated robot, give it an understanding of its surroundings with SLAM, set up an autonomous patrol, watch it operate remotely, and configure it to charge itself — all without physical hardware or writing any code.
Two portal pages work together here. **Cloud Simulator** provisions and bills the GPU instance (Step 1). **Machine Teleops** is where you drive the robot and control autonomy (Steps 2–9). Knowing which page does what is most of the battle.
#### Step 1: Launch a Simulator Session
1. Log in to the [OpenMind Portal](https://portal.openmind.com)
2. Navigate to **Cloud Simulator** from the sidebar
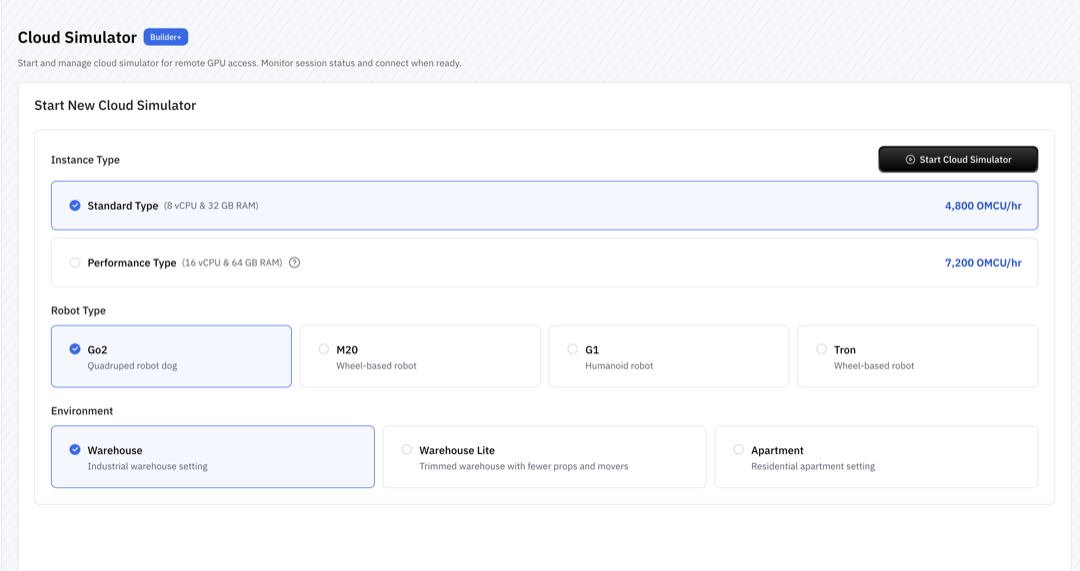
3. Select the instance type, robot model and environment you'd like to work in, then click **Start Cloud Simulator**
**Instance Types**
Choose based on your simulation workload:
| Instance Type | vCPUs | RAM | Best For | Price (Per Hour) |
| -------------------- | ----- | ----- | ------------------------------------ | ---------------- |
| **Standard Type** | 8 | 32 GB | Development & testing | 4,800 OMCU |
| **Performance Type** | 16 | 64 GB | Heavy compute, multi-robot scenarios | 7,200 OMCU |
The portal recommends **Performance Type** for optimal simulator performance. Choose Standard Type when you want to keep costs down and your scenario is light.
 **Supported Robots**
The portal lists these by short name:
| Portal label | Robot |
| ------------ | ----------------------- |
| **Go2** | Unitree Go2 (quadruped) |
| **M20** | Deep Robotics M20 Pro |
| **G1** | Unitree G1 (humanoid) |
| **Tron** | LimX Tron |
**Available Environments**
* **Warehouse** — industrial warehouse setting
* **Warehouse Lite** — trimmed warehouse with fewer props and movers
* **Apartment** — residential apartment setting
**Second Floor (Warehouse only)**
Below the environment picker is a **Second Floor** toggle, available for the Warehouse environment only. Per its in-portal tooltip: "Enables the second floors for 3D navigation. Leave this off if you want to do 2D navigation."
Leave this **off** if you plan to follow the SLAM and patrol steps below, which use the 2D navigation map.
**Launch Time**
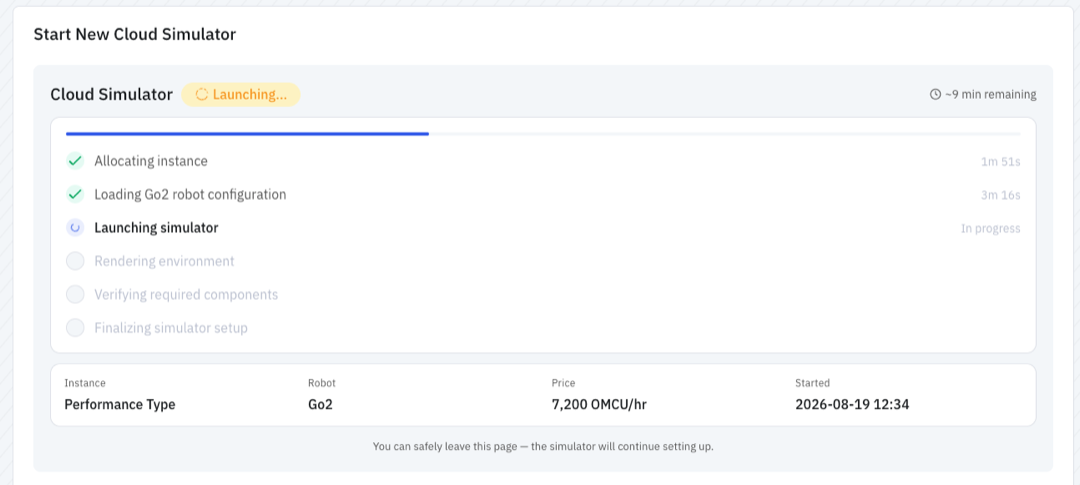
The instance goes through six stages before it is ready:
1. Allocating instance
2. Loading `` robot configuration
3. Launching simulator
4. Rendering environment
5. Verifying required components
6. Finalizing simulator setup
The status badge at the top of the card tracks these as **Provisioning…**, **Configuring…**, **Rendering…**, and **Finalizing…**, and the card shows a running estimate of the time remaining.
> **Note**: Expect **10–15 minutes** for your instance to fully initialize. You can safely leave the page — the simulator continues setting up in the background.
Once you initiate the launch, the system begins setting up your cloud environment.
**Supported Robots**
The portal lists these by short name:
| Portal label | Robot |
| ------------ | ----------------------- |
| **Go2** | Unitree Go2 (quadruped) |
| **M20** | Deep Robotics M20 Pro |
| **G1** | Unitree G1 (humanoid) |
| **Tron** | LimX Tron |
**Available Environments**
* **Warehouse** — industrial warehouse setting
* **Warehouse Lite** — trimmed warehouse with fewer props and movers
* **Apartment** — residential apartment setting
**Second Floor (Warehouse only)**
Below the environment picker is a **Second Floor** toggle, available for the Warehouse environment only. Per its in-portal tooltip: "Enables the second floors for 3D navigation. Leave this off if you want to do 2D navigation."
Leave this **off** if you plan to follow the SLAM and patrol steps below, which use the 2D navigation map.
**Launch Time**
The instance goes through six stages before it is ready:
1. Allocating instance
2. Loading `` robot configuration
3. Launching simulator
4. Rendering environment
5. Verifying required components
6. Finalizing simulator setup
The status badge at the top of the card tracks these as **Provisioning…**, **Configuring…**, **Rendering…**, and **Finalizing…**, and the card shows a running estimate of the time remaining.
> **Note**: Expect **10–15 minutes** for your instance to fully initialize. You can safely leave the page — the simulator continues setting up in the background.
Once you initiate the launch, the system begins setting up your cloud environment.
 The instance is ready when the status changes to **Ready**.
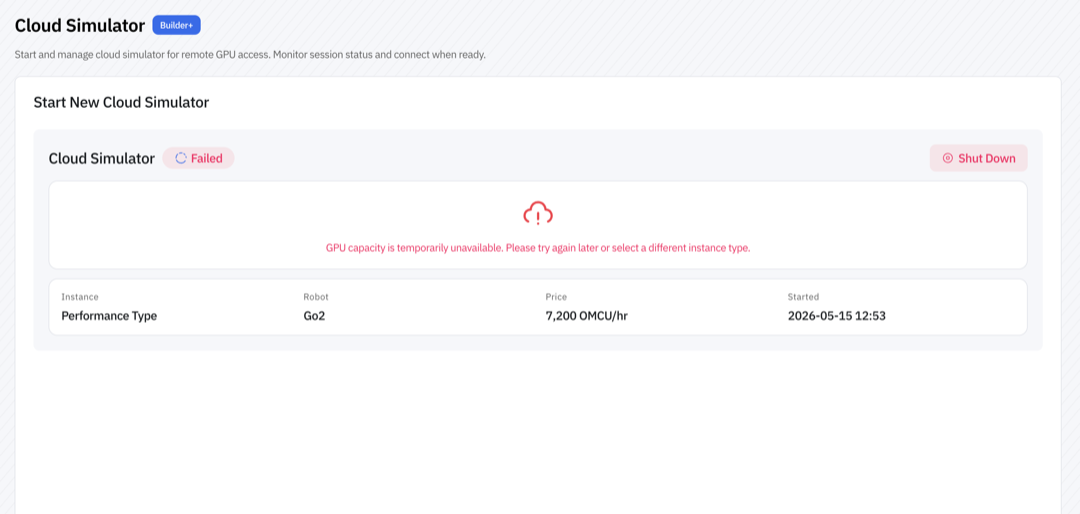
> **Note**: If GPU capacity is not available, the launch fails with `GPU capacity is temporarily unavailable. Please try again later or select a different instance type.` This is often transient and the platform may retry and recover on its own — check the card again before relaunching. If it does not recover, shut the failed instance down, then try again or switch instance type.
The instance is ready when the status changes to **Ready**.
> **Note**: If GPU capacity is not available, the launch fails with `GPU capacity is temporarily unavailable. Please try again later or select a different instance type.` This is often transient and the platform may retry and recover on its own — check the card again before relaunching. If it does not recover, shut the failed instance down, then try again or switch instance type.
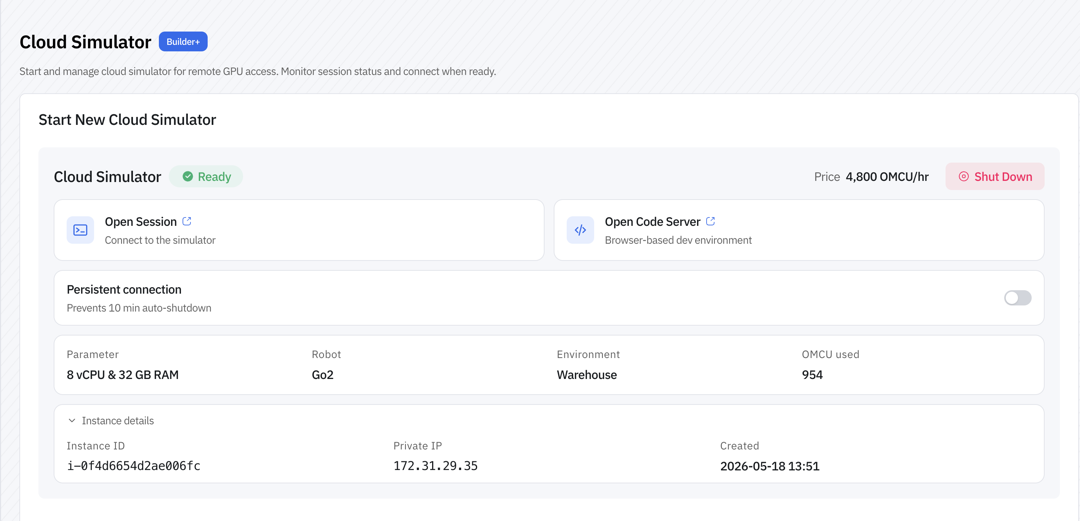
 Once the instance is **Ready**, its card offers:
* **Open Session** — the streamed Isaac Sim 3D viewport (not where autonomy is controlled)
* **Open Code Server** — a browser-based dev environment (see [Part 2, Option A](#option-a-code-server))
* **Persistent connection** — prevents the 10-minute idle auto-shutdown
* **OMCU used** — live spend counter
* **Instance details** — expandable, showing Instance ID, Private IP, and creation timestamp
* **Shut Down** — tears the instance down and stops billing
Once the instance is **Ready**, its card offers:
* **Open Session** — the streamed Isaac Sim 3D viewport (not where autonomy is controlled)
* **Open Code Server** — a browser-based dev environment (see [Part 2, Option A](#option-a-code-server))
* **Persistent connection** — prevents the 10-minute idle auto-shutdown
* **OMCU used** — live spend counter
* **Instance details** — expandable, showing Instance ID, Private IP, and creation timestamp
* **Shut Down** — tears the instance down and stops billing
 **Where to go next: two pages, two jobs**
This is the most important thing to understand about the Cloud Simulator, and it trips up almost everyone on their first run:
* The **Cloud Simulator** page provisions and bills the GPU instance. That's all it does.
* **Machine Teleops** is where you actually drive the robot — camera feeds, SLAM, navigation, and route planning all live there.
**Open Session** streams the Isaac Sim 3D viewport: a rendered view of the physics scene. It's useful for watching the simulation, but it is **not** where you map, navigate, or patrol. If you're looking for the autonomy controls, go to **Machine Teleops** in the sidebar — everything from Step 2 onward happens there.
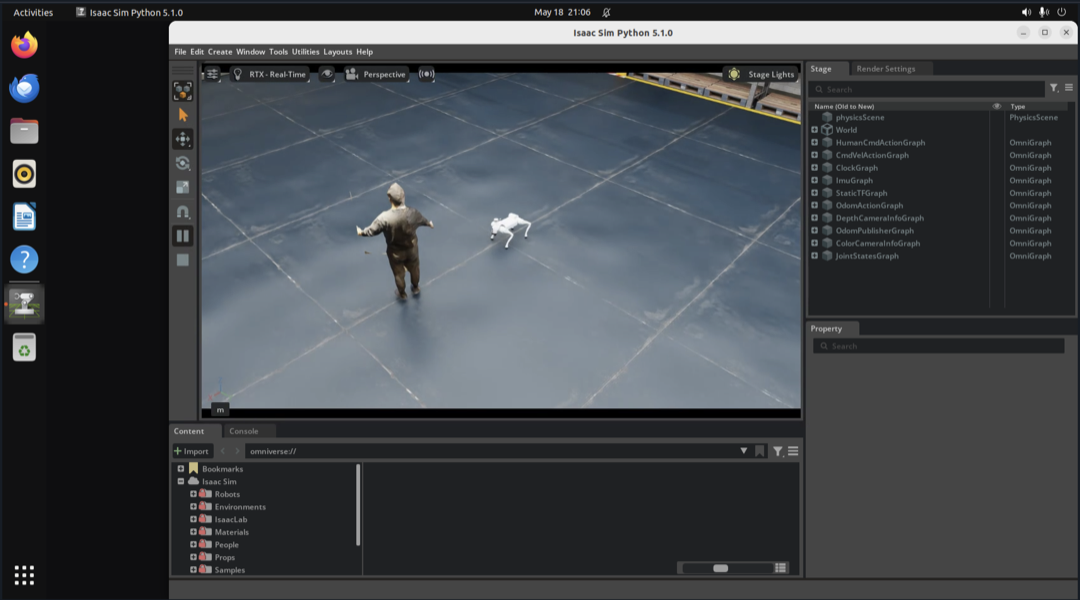
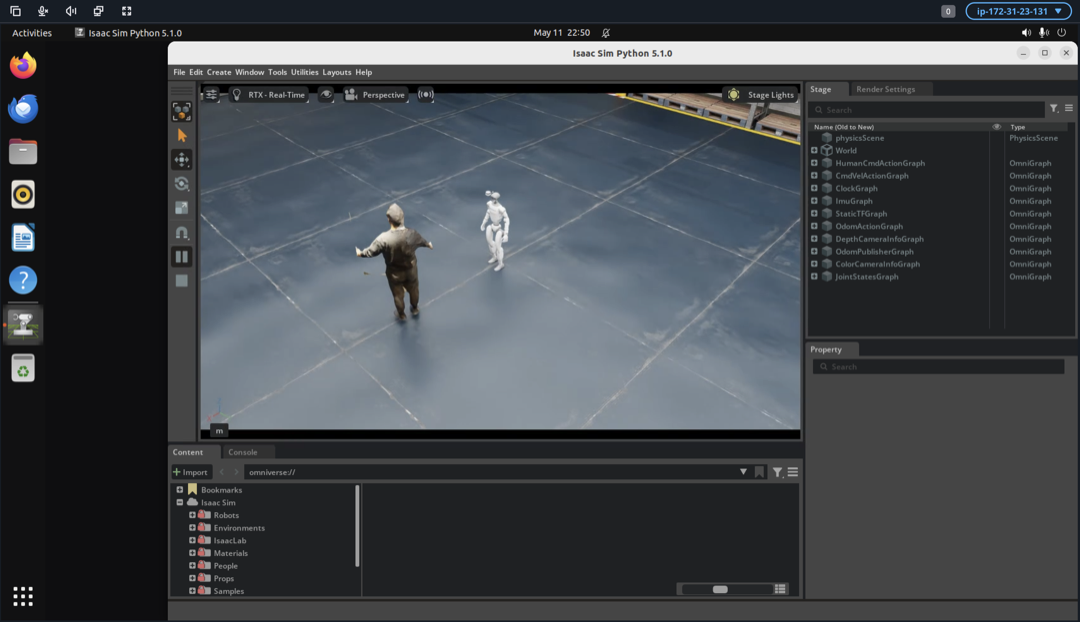
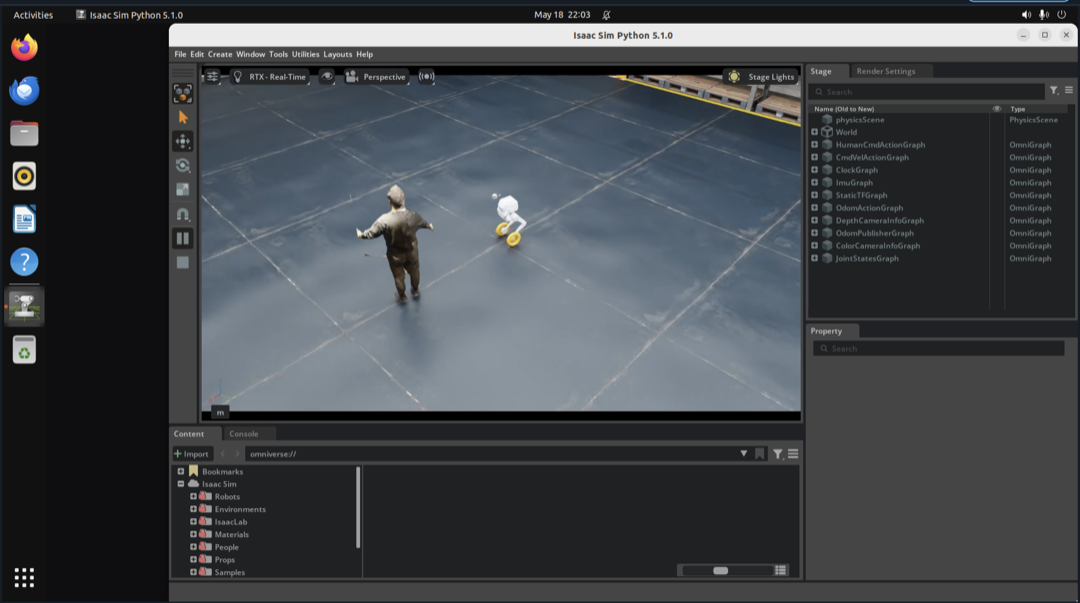
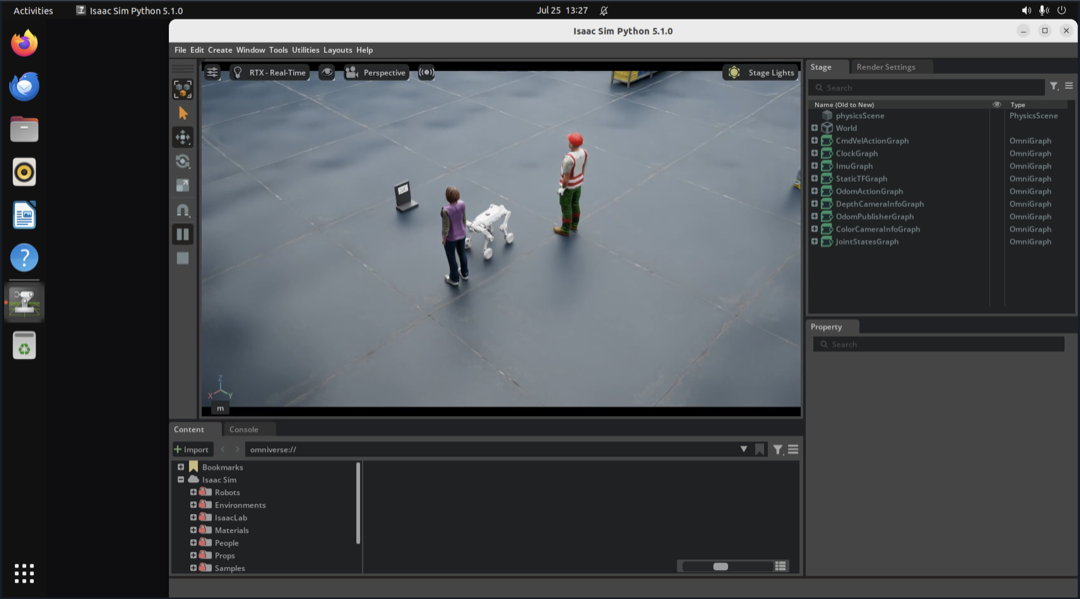
The Open Session viewport reflects the robot you selected when launching the instance:
Unitree Go2 in the cloud simulator warehouse environment:
**Where to go next: two pages, two jobs**
This is the most important thing to understand about the Cloud Simulator, and it trips up almost everyone on their first run:
* The **Cloud Simulator** page provisions and bills the GPU instance. That's all it does.
* **Machine Teleops** is where you actually drive the robot — camera feeds, SLAM, navigation, and route planning all live there.
**Open Session** streams the Isaac Sim 3D viewport: a rendered view of the physics scene. It's useful for watching the simulation, but it is **not** where you map, navigate, or patrol. If you're looking for the autonomy controls, go to **Machine Teleops** in the sidebar — everything from Step 2 onward happens there.
The Open Session viewport reflects the robot you selected when launching the instance:
Unitree Go2 in the cloud simulator warehouse environment:
 Unitree G1 humanoid in the cloud simulator:
 LimX Tron in the cloud simulator:
 Deep Robotics M20 Pro in the cloud simulator:
 #### Step 2: Connect to the Robot in Machine Teleops
Open **Machine Teleops** from the sidebar. Under **Machine Selection** in the left **Robot Settings** panel, your simulated robot appears once the instance is **Ready**. If you see "No machines found", the instance isn't Ready yet — or it has already auto-shut down. Check the Cloud Simulator card before troubleshooting anything else.
Select the machine. The state badge moves off **Inactive**, and the **Robot Preference** dropdown becomes usable — until a machine is connected it stays disabled with "Connection is needed for robot preference".
The right-hand pane has three tabs, and you'll use them in this order: **Camera**, **Map view**, **Route Planner**.
#### Step 3: Explore & Teleoperate
Open the **Camera** tab. You get three independently expandable feeds — **Front Camera**, **Top Camera**, and **Down Camera** — alongside robot status and manual teleoperation controls.
Drive the robot around to verify that it's connected and responding correctly. This is worth the couple of minutes: it confirms the simulation is live before you commit to a mapping run, and it's the fastest way to get a feel for the environment.
> **Tip**: You can also drive the robot with an **Xbox controller**. Pair the controller to your computer over Bluetooth and use it to teleoperate the robot in the simulator.
#### Step 4: Build a Map with SLAM
In the **Robot Settings** panel, under **SLAM Mode**, pick one of four cards *before* enabling the toggle:
* **2D SLAM** — occupancy map. The default, and what patrols and 2D navigation consume.
* **3D SLAM** — point cloud (**BETA**). Note the limitation: **3D SLAM does not support frontier exploration**, so the robot won't map autonomously in this mode.
* **3D Color** — a colorized (RGB) point cloud (**BETA**). Photoreal, but **view-only** — it produces no navigable map, so use it for inspection, not for patrols or navigation.
* **3D Full** — "Nav + color" (**BETA**): runs the geometry and color stacks together, so one run gives you a navigable 3D map *and* the colorized cloud.
> **On a real Go2, only 2D SLAM is available** — the three 3D modes are simulation-only for Go2. The cloud simulator is where you can try them on a Go2. (M20 supports 3D on hardware too.) See [Robot & simulation support](/full-autonomy-guidelines/features/robot-support.md).
Now enable **SLAM Mode**. What happens next surprises people who expect to chauffeur the robot around:
> **In 2D SLAM the robot explores and builds the map by itself**, with real-time visualization, and the map is saved to the database when complete. Manual driving is optional. The 3D modes don't self-explore — drive those yourself.
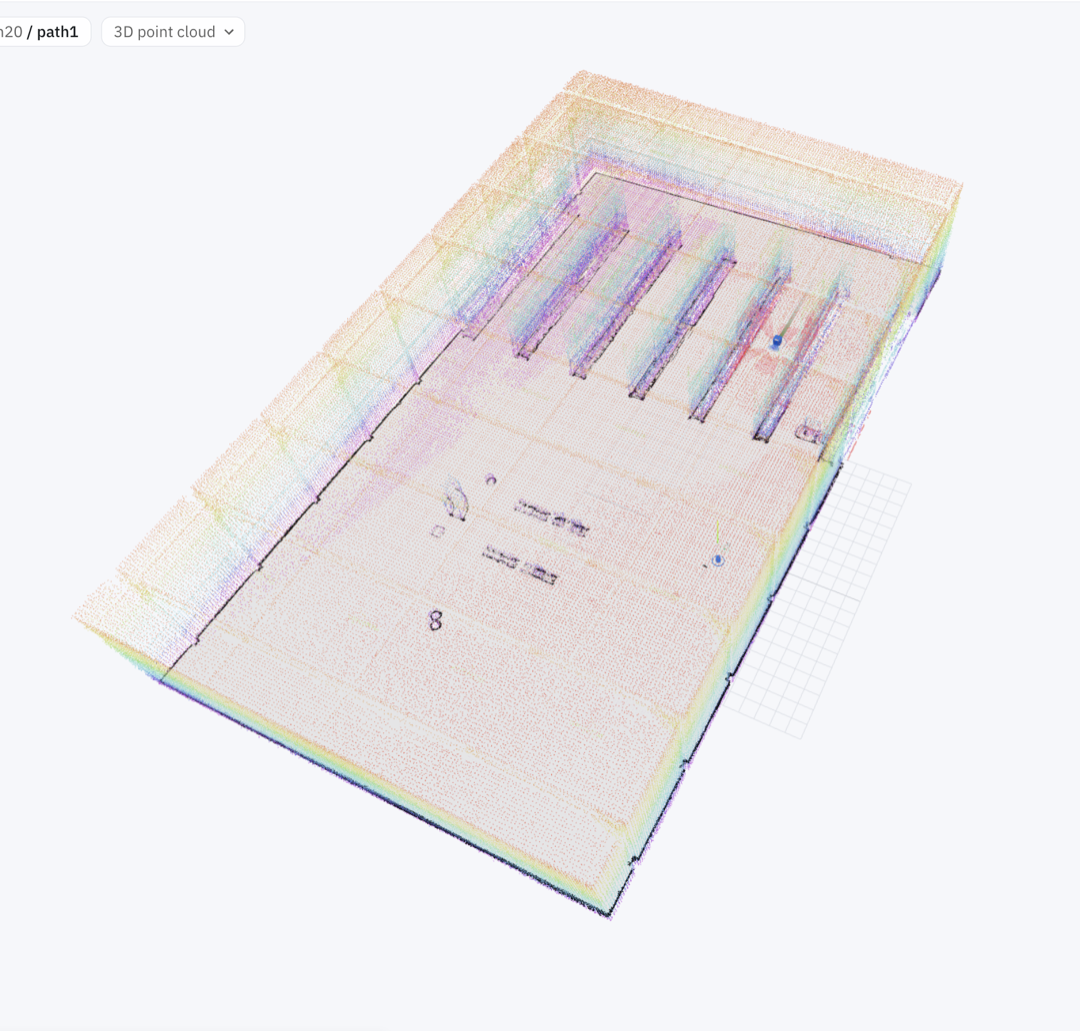
Watch progress on the **Map view** tab. The map header has a variant dropdown — **2D map**, **3D point cloud**, or **Colored cloud** — so you can flip between representations of the same run. The 3D SLAM point cloud is colored by height:
#### Step 2: Connect to the Robot in Machine Teleops
Open **Machine Teleops** from the sidebar. Under **Machine Selection** in the left **Robot Settings** panel, your simulated robot appears once the instance is **Ready**. If you see "No machines found", the instance isn't Ready yet — or it has already auto-shut down. Check the Cloud Simulator card before troubleshooting anything else.
Select the machine. The state badge moves off **Inactive**, and the **Robot Preference** dropdown becomes usable — until a machine is connected it stays disabled with "Connection is needed for robot preference".
The right-hand pane has three tabs, and you'll use them in this order: **Camera**, **Map view**, **Route Planner**.
#### Step 3: Explore & Teleoperate
Open the **Camera** tab. You get three independently expandable feeds — **Front Camera**, **Top Camera**, and **Down Camera** — alongside robot status and manual teleoperation controls.
Drive the robot around to verify that it's connected and responding correctly. This is worth the couple of minutes: it confirms the simulation is live before you commit to a mapping run, and it's the fastest way to get a feel for the environment.
> **Tip**: You can also drive the robot with an **Xbox controller**. Pair the controller to your computer over Bluetooth and use it to teleoperate the robot in the simulator.
#### Step 4: Build a Map with SLAM
In the **Robot Settings** panel, under **SLAM Mode**, pick one of four cards *before* enabling the toggle:
* **2D SLAM** — occupancy map. The default, and what patrols and 2D navigation consume.
* **3D SLAM** — point cloud (**BETA**). Note the limitation: **3D SLAM does not support frontier exploration**, so the robot won't map autonomously in this mode.
* **3D Color** — a colorized (RGB) point cloud (**BETA**). Photoreal, but **view-only** — it produces no navigable map, so use it for inspection, not for patrols or navigation.
* **3D Full** — "Nav + color" (**BETA**): runs the geometry and color stacks together, so one run gives you a navigable 3D map *and* the colorized cloud.
> **On a real Go2, only 2D SLAM is available** — the three 3D modes are simulation-only for Go2. The cloud simulator is where you can try them on a Go2. (M20 supports 3D on hardware too.) See [Robot & simulation support](/full-autonomy-guidelines/features/robot-support.md).
Now enable **SLAM Mode**. What happens next surprises people who expect to chauffeur the robot around:
> **In 2D SLAM the robot explores and builds the map by itself**, with real-time visualization, and the map is saved to the database when complete. Manual driving is optional. The 3D modes don't self-explore — drive those yourself.
Watch progress on the **Map view** tab. The map header has a variant dropdown — **2D map**, **3D point cloud**, or **Colored cloud** — so you can flip between representations of the same run. The 3D SLAM point cloud is colored by height:
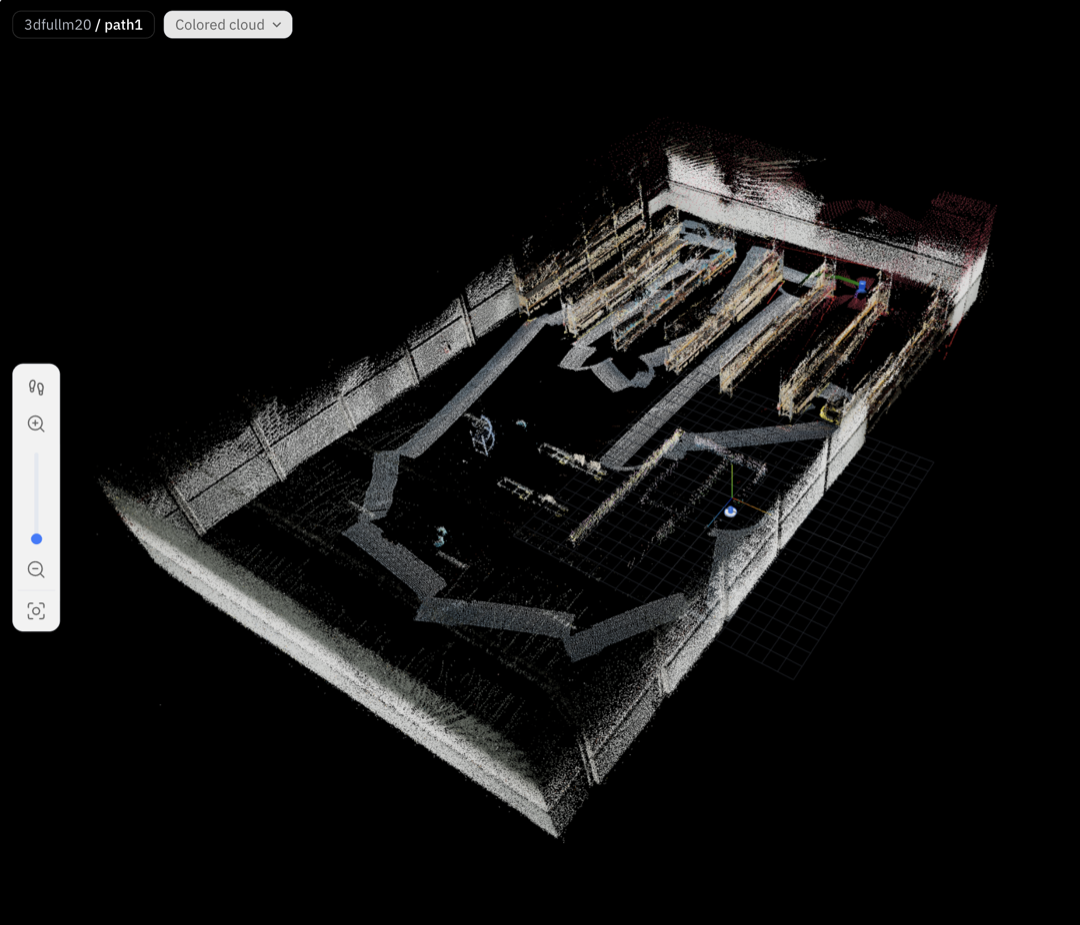
 A **3D Color** or **3D Full** run instead renders a true-color (RGB) cloud — the environment in its real colors:
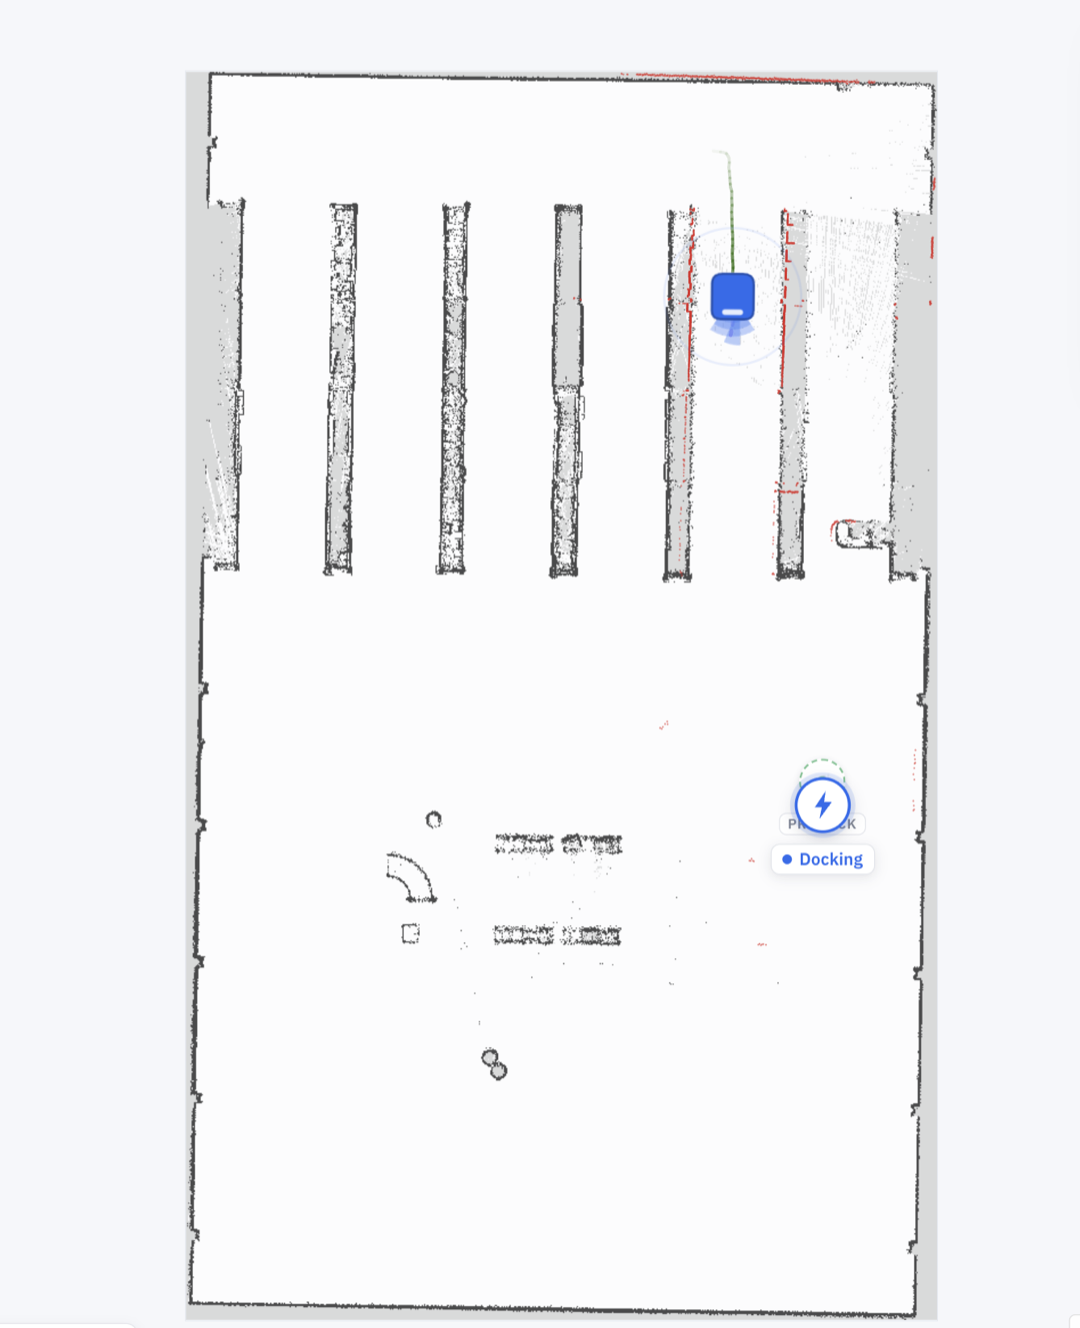
 Every run is also flattened into a **2D navigation map** — an occupancy grid showing walls and obstacles. This is the navigation-ready artifact used for autonomous tasks like patrols and navigation.
If Map view reads "Enable SLAM or select a map from Settings to view the map", the toggle didn't take.
**Let the run finish.** The map has to complete and save before anything downstream can use it — and this is the step where the 10-minute idle auto-shutdown most often costs people their work.
#### Step 5: Switch to Navigation on the Saved Map
You'll normally navigate on the map you just built — but it doesn't carry over automatically. **The map has to be saved, and then selected for navigation**. Those are two extra actions after mapping finishes, and skipping either is the most common reason Navigation Mode and Route Planner appear to do nothing.
Under **Navigation Mode**, choose **2D Navigation** (occupancy map) or **3D Navigation** (point cloud, BETA), then pick your saved map from the list below. Until a completed SLAM run exists, that panel reads:
> "No 2D maps available — Save a map in SLAM Mode first, then select a 2D map here for navigation."
Select the map from Step 4 and enable **Navigation Mode**. The robot will now navigate using that existing 2D map, with autonomous navigation driven by **PCT** global planning and **MPPI** local planning.
With Navigation active, **Map view** gains **Set Goal** and **Localize** tools and shows the robot's live position:
Every run is also flattened into a **2D navigation map** — an occupancy grid showing walls and obstacles. This is the navigation-ready artifact used for autonomous tasks like patrols and navigation.
If Map view reads "Enable SLAM or select a map from Settings to view the map", the toggle didn't take.
**Let the run finish.** The map has to complete and save before anything downstream can use it — and this is the step where the 10-minute idle auto-shutdown most often costs people their work.
#### Step 5: Switch to Navigation on the Saved Map
You'll normally navigate on the map you just built — but it doesn't carry over automatically. **The map has to be saved, and then selected for navigation**. Those are two extra actions after mapping finishes, and skipping either is the most common reason Navigation Mode and Route Planner appear to do nothing.
Under **Navigation Mode**, choose **2D Navigation** (occupancy map) or **3D Navigation** (point cloud, BETA), then pick your saved map from the list below. Until a completed SLAM run exists, that panel reads:
> "No 2D maps available — Save a map in SLAM Mode first, then select a 2D map here for navigation."
Select the map from Step 4 and enable **Navigation Mode**. The robot will now navigate using that existing 2D map, with autonomous navigation driven by **PCT** global planning and **MPPI** local planning.
With Navigation active, **Map view** gains **Set Goal** and **Localize** tools and shows the robot's live position:
 Send the robot to a single goal before building a route. One successful point-to-point run confirms localization is healthy, which saves debugging a multi-waypoint patrol that was never going to work.
#### Step 6: Create an Autonomous Patrol
Open the **Route Planner** tab and create a **patrol route** by placing waypoints throughout the environment. If the tab says "Please select a map from Settings to start planning", finish Step 5 first — the planner needs a selected map.
1. Click **+ New Route** to start a fresh route.
2. Toggle **Add Waypoints** and click points across the map to lay out the path. Use smooth turns so the robot can navigate naturally. **Undo Last** removes the most recent waypoint, and the node/edge count updates as you build. You can also **Import** or **Export** a route to reuse it later.
3. When you're happy with the path, click **Deploy** and choose how it should run:
* **Manual** — run the route once; nothing restarts it.
* **Continuous** — patrol until stopped, charging and resuming as the battery needs.
* **Scheduled** — patrol only inside set weekday/time windows; the robot waits on the charger in between.
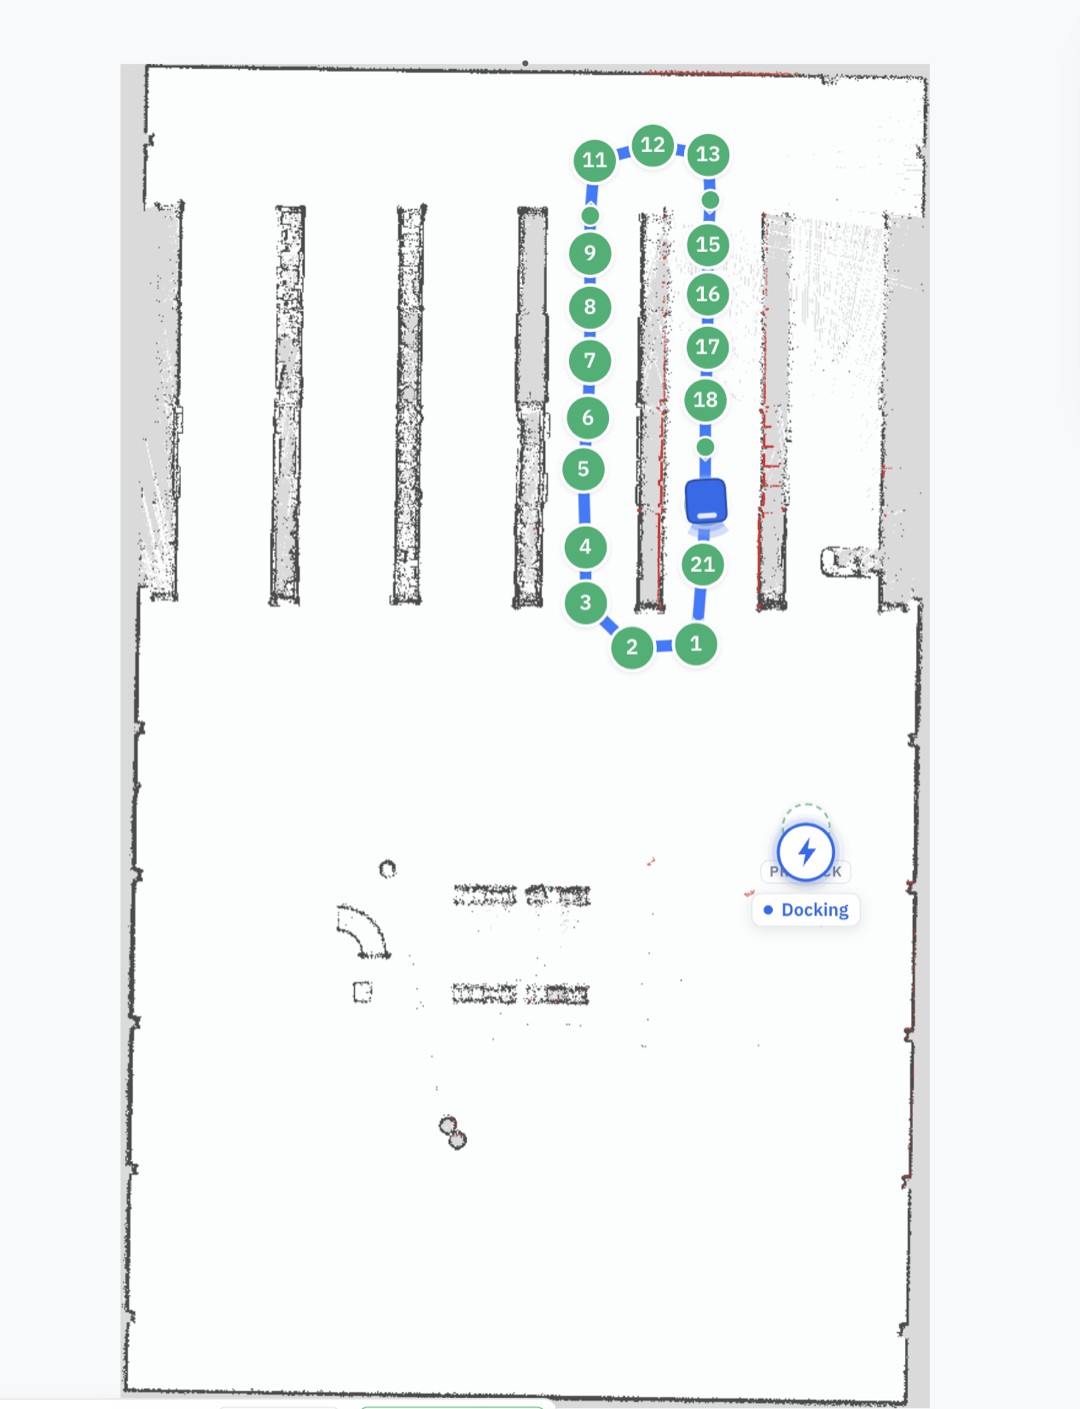
The robot then takes over and begins following the route autonomously, navigating between each waypoint while continuously localizing itself within the map. The route overlays on whichever map variant you're viewing — the 2D occupancy grid:
Send the robot to a single goal before building a route. One successful point-to-point run confirms localization is healthy, which saves debugging a multi-waypoint patrol that was never going to work.
#### Step 6: Create an Autonomous Patrol
Open the **Route Planner** tab and create a **patrol route** by placing waypoints throughout the environment. If the tab says "Please select a map from Settings to start planning", finish Step 5 first — the planner needs a selected map.
1. Click **+ New Route** to start a fresh route.
2. Toggle **Add Waypoints** and click points across the map to lay out the path. Use smooth turns so the robot can navigate naturally. **Undo Last** removes the most recent waypoint, and the node/edge count updates as you build. You can also **Import** or **Export** a route to reuse it later.
3. When you're happy with the path, click **Deploy** and choose how it should run:
* **Manual** — run the route once; nothing restarts it.
* **Continuous** — patrol until stopped, charging and resuming as the battery needs.
* **Scheduled** — patrol only inside set weekday/time windows; the robot waits on the charger in between.
The robot then takes over and begins following the route autonomously, navigating between each waypoint while continuously localizing itself within the map. The route overlays on whichever map variant you're viewing — the 2D occupancy grid:
 …or the 3D point cloud:
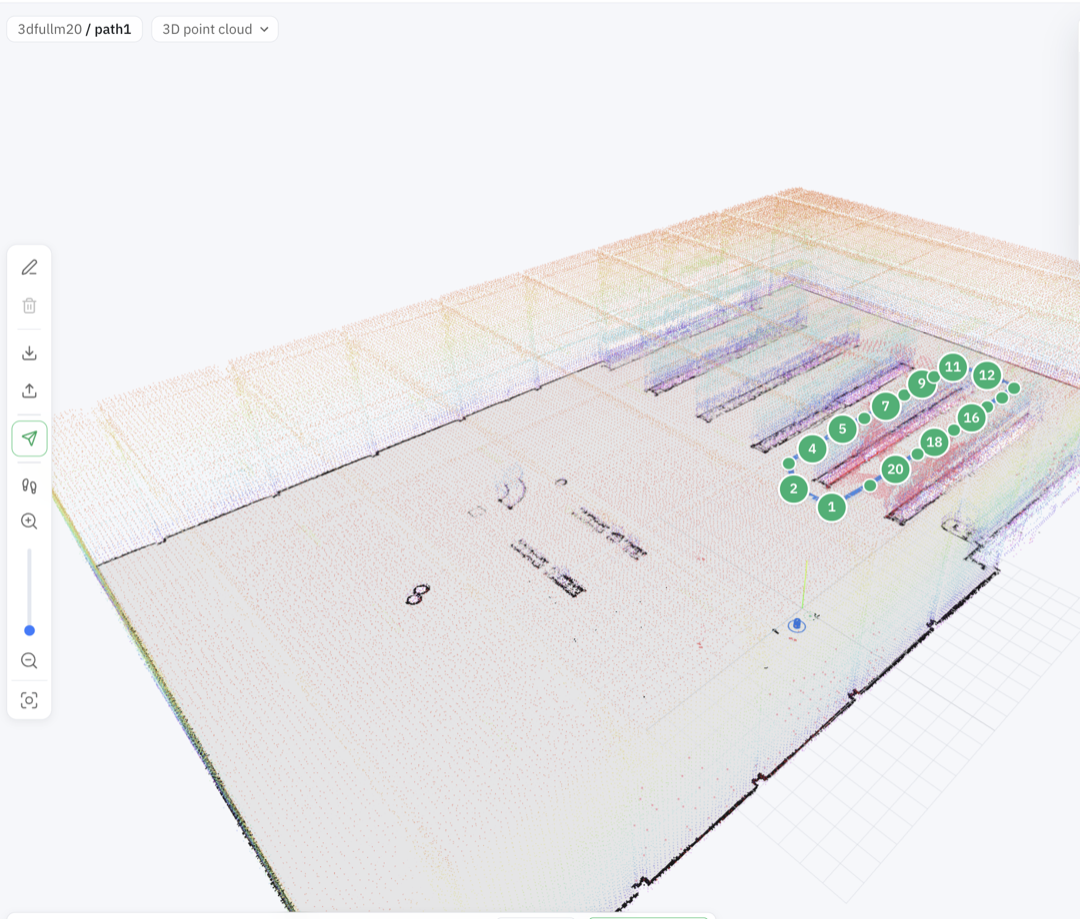 For the full deploy flow — Manual vs Continuous vs Scheduled, the weekday/time-window editor, and how it ties into auto-charging — see [Patrol → Scheduling patrols](/full-autonomy-guidelines/features/patrol.md#scheduling-patrols).
#### Step 7: Monitor the Patrol
While the robot carries out its patrol, monitor everything directly from Machine Teleops — the three camera feeds, robot status, and patrol progress. This makes it easy to remotely verify that everything is operating as expected without being physically present.
Sessions can also be captured for later review from **Recordings** in the sidebar.
#### Step 8: Configure Autonomous Charging
Autonomous robots also need to manage their battery. Instead of waiting for an operator to intervene, configure a **battery threshold** that automatically sends the robot back to its charging station.
Set the minimum battery level. Once the battery drops below that threshold, the robot automatically:
1. Pauses its patrol
2. Returns to the docking station
3. Re-localizes if needed
4. Docks and charges
Once charged, it's ready to continue operating. This enables long-running deployments with minimal manual intervention.
> **Note**: Autonomous charging is supported on the **Unitree Go2** and the **Deep Robotics M20 Pro**, and it behaves the same in the simulator as on hardware. On a multi-pack robot like the M20 Pro, battery state shows per pack (front / rear). See [Auto Charging](/full-autonomy-guidelines/features/auto-charging.md).
#### Step 9: Autonomous Localization
If the robot starts up again or loses localization, it can automatically determine its position on the existing map before continuing its mission. This removes another manual step from the deployment process and helps keep operations running smoothly.
#### Troubleshooting
The portal guides rather than errors — when a step is missing, the next control sits inert with an empty-state message instead of failing loudly. These messages are the fastest way to work out where you are:
| What you see | What it means |
| ------------------------------------------------------------ | ------------------------------------------------------------------------------------------------------------------------------- |
| "No machines found." in Machine Selection | The instance isn't **Ready**, or it auto-shut down after 10 idle minutes |
| "Connection is needed for robot preference" | No machine selected yet |
| "Enable SLAM or select a map from Settings to view the map." | SLAM Mode is off and no saved map is selected |
| "No 2D maps available" under Navigation Mode | No completed SLAM run has saved a map yet — finish Step 4 |
| "Please select a map from Settings to start planning." | Route Planner needs a saved map selected under Navigation Mode |
| The robot won't explore during SLAM | Expected in **3D SLAM**, which doesn't support frontier exploration — use 2D SLAM |
| A certificate warning on **Open Session** | Known issue with the DCV gateway. You don't need Open Session for any of Steps 2–9; the whole flow runs through Machine Teleops |
#### Cleaning Up
When you're finished with your simulation:
1. Return to the Cloud Simulator dashboard
2. Click **Shut Down** on the instance card
For the full deploy flow — Manual vs Continuous vs Scheduled, the weekday/time-window editor, and how it ties into auto-charging — see [Patrol → Scheduling patrols](/full-autonomy-guidelines/features/patrol.md#scheduling-patrols).
#### Step 7: Monitor the Patrol
While the robot carries out its patrol, monitor everything directly from Machine Teleops — the three camera feeds, robot status, and patrol progress. This makes it easy to remotely verify that everything is operating as expected without being physically present.
Sessions can also be captured for later review from **Recordings** in the sidebar.
#### Step 8: Configure Autonomous Charging
Autonomous robots also need to manage their battery. Instead of waiting for an operator to intervene, configure a **battery threshold** that automatically sends the robot back to its charging station.
Set the minimum battery level. Once the battery drops below that threshold, the robot automatically:
1. Pauses its patrol
2. Returns to the docking station
3. Re-localizes if needed
4. Docks and charges
Once charged, it's ready to continue operating. This enables long-running deployments with minimal manual intervention.
> **Note**: Autonomous charging is supported on the **Unitree Go2** and the **Deep Robotics M20 Pro**, and it behaves the same in the simulator as on hardware. On a multi-pack robot like the M20 Pro, battery state shows per pack (front / rear). See [Auto Charging](/full-autonomy-guidelines/features/auto-charging.md).
#### Step 9: Autonomous Localization
If the robot starts up again or loses localization, it can automatically determine its position on the existing map before continuing its mission. This removes another manual step from the deployment process and helps keep operations running smoothly.
#### Troubleshooting
The portal guides rather than errors — when a step is missing, the next control sits inert with an empty-state message instead of failing loudly. These messages are the fastest way to work out where you are:
| What you see | What it means |
| ------------------------------------------------------------ | ------------------------------------------------------------------------------------------------------------------------------- |
| "No machines found." in Machine Selection | The instance isn't **Ready**, or it auto-shut down after 10 idle minutes |
| "Connection is needed for robot preference" | No machine selected yet |
| "Enable SLAM or select a map from Settings to view the map." | SLAM Mode is off and no saved map is selected |
| "No 2D maps available" under Navigation Mode | No completed SLAM run has saved a map yet — finish Step 4 |
| "Please select a map from Settings to start planning." | Route Planner needs a saved map selected under Navigation Mode |
| The robot won't explore during SLAM | Expected in **3D SLAM**, which doesn't support frontier exploration — use 2D SLAM |
| A certificate warning on **Open Session** | Known issue with the DCV gateway. You don't need Open Session for any of Steps 2–9; the whole flow runs through Machine Teleops |
#### Cleaning Up
When you're finished with your simulation:
1. Return to the Cloud Simulator dashboard
2. Click **Shut Down** on the instance card
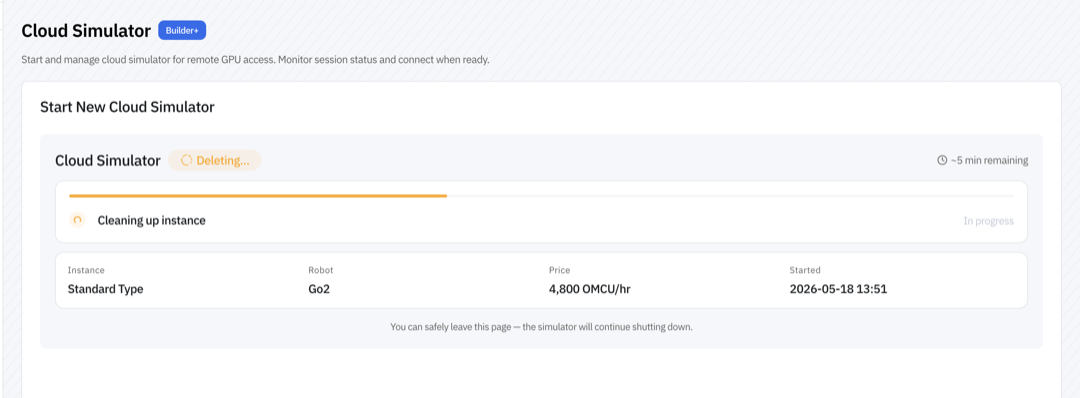 3. The card moves to a **Deleting…** state and runs a **Cleaning up instance** stage. Teardown takes roughly **5 minutes**; billing stops once it completes and cloud resources are freed.
> **Note**: If **Shut Down** appears greyed out on a **Ready** instance, reload the page — a stale `Session is currently "Provisioning..."` banner can leave the control disabled after provisioning finishes.
### Part 2 — Connecting OM1
Part 1 runs the robot's autonomy entirely from the portal. If you want to drive the simulator with the **OM1 runtime** — for example to test your own agent behaviors, inputs, and actions — connect OM1 to a running instance using one of the two options below.
#### Option A: Code Server
Click **Open Code Server** on the Ready instance card to open a browser-based [code-server](https://github.com/coder/code-server) dev environment running alongside your simulator. No local setup is required.
3. The card moves to a **Deleting…** state and runs a **Cleaning up instance** stage. Teardown takes roughly **5 minutes**; billing stops once it completes and cloud resources are freed.
> **Note**: If **Shut Down** appears greyed out on a **Ready** instance, reload the page — a stale `Session is currently "Provisioning..."` banner can leave the control disabled after provisioning finishes.
### Part 2 — Connecting OM1
Part 1 runs the robot's autonomy entirely from the portal. If you want to drive the simulator with the **OM1 runtime** — for example to test your own agent behaviors, inputs, and actions — connect OM1 to a running instance using one of the two options below.
#### Option A: Code Server
Click **Open Code Server** on the Ready instance card to open a browser-based [code-server](https://github.com/coder/code-server) dev environment running alongside your simulator. No local setup is required.
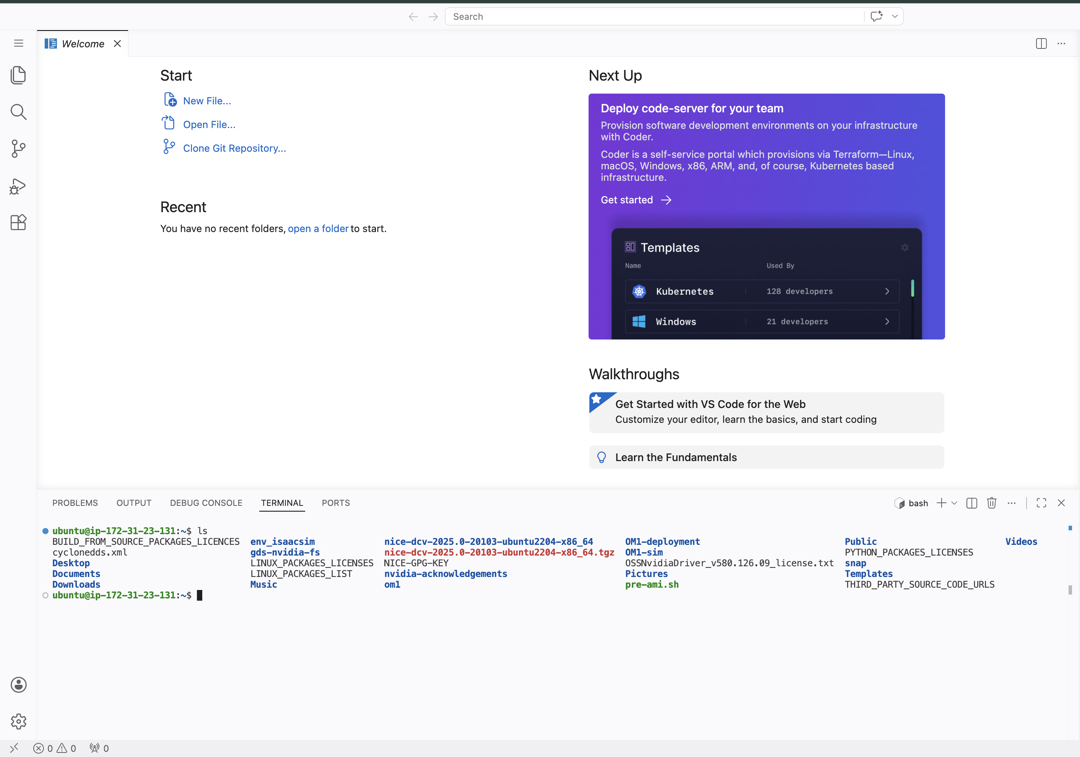 From here, you can:
* Edit and run OM1 code directly in the cloud
* Execute `make run` commands without local hardware
* Test and debug your robot behaviors
> **Note**: Code Server opens on a workspace folder that may not be the OM1 repository — check the folder shown in the Explorer and use **File → Open Folder** to switch to the OM1 checkout if needed. The editor also opens in **Restricted Mode**; you'll need to trust the workspace before tasks and debugging will run.
#### Option B: Local Environment
Run OM1 on your local machine and connect to the cloud simulator:
1. Copy your **API Key** from the portal and ensure `OM_API_KEY` is set in your environment or `.env` file.
2. Open `config/unitree_go2_autonomy.json5` in your local OM1 repo. This config targets a Unitree Go2 in the cloud simulator with voice input, VLM, and autonomous movement. You can adjust the `system_prompt_base`, robot inputs, and actions to match your use case.
3. Run the config:
```bash
CONFIG=unitree_go2_autonomy USE_SIM=true make dev
```
### What's Next?
* Explore the [unitree\_go2\_modes config](https://github.com/OpenMind/OM1/blob/main/config/unitree_go2_modes.json5) to try multi-mode behaviors (including SLAM and Patrol) in the cloud sim
* Read the [Configuration Guide](/build/concepts/3_configuration.md) to modify inputs, actions, and prompts in your config
---
# Agent Instructions
This documentation is published with GitBook. GitBook is the documentation platform designed so that both humans and AI agents can read, navigate, and reason over technical content effectively. Learn more at gitbook.com.
## Querying This Documentation
If you need additional information that is not directly available in this page, you can query the documentation dynamically by asking a question.
Perform an HTTP GET request on the current page URL with the `ask` query parameter, and the optional `goal` query parameter:
```
GET https://docs.openmind.com/simulators/cloud-isaac-sim.md?ask=&goal=
```
`ask` is the immediate question: it should be specific, self-contained, and written in natural language.
`goal` is optional and describes the broader end goal you are ultimately trying to accomplish on behalf of the user. GitBook uses it to tailor the answer towards what is most useful for that goal.
The response will contain a direct answer to the question and relevant excerpts and sources from the documentation.
Use this mechanism when the answer is not explicitly present in the current page, you need clarification or additional context, or you want to retrieve related documentation sections.
From here, you can:
* Edit and run OM1 code directly in the cloud
* Execute `make run` commands without local hardware
* Test and debug your robot behaviors
> **Note**: Code Server opens on a workspace folder that may not be the OM1 repository — check the folder shown in the Explorer and use **File → Open Folder** to switch to the OM1 checkout if needed. The editor also opens in **Restricted Mode**; you'll need to trust the workspace before tasks and debugging will run.
#### Option B: Local Environment
Run OM1 on your local machine and connect to the cloud simulator:
1. Copy your **API Key** from the portal and ensure `OM_API_KEY` is set in your environment or `.env` file.
2. Open `config/unitree_go2_autonomy.json5` in your local OM1 repo. This config targets a Unitree Go2 in the cloud simulator with voice input, VLM, and autonomous movement. You can adjust the `system_prompt_base`, robot inputs, and actions to match your use case.
3. Run the config:
```bash
CONFIG=unitree_go2_autonomy USE_SIM=true make dev
```
### What's Next?
* Explore the [unitree\_go2\_modes config](https://github.com/OpenMind/OM1/blob/main/config/unitree_go2_modes.json5) to try multi-mode behaviors (including SLAM and Patrol) in the cloud sim
* Read the [Configuration Guide](/build/concepts/3_configuration.md) to modify inputs, actions, and prompts in your config
---
# Agent Instructions
This documentation is published with GitBook. GitBook is the documentation platform designed so that both humans and AI agents can read, navigate, and reason over technical content effectively. Learn more at gitbook.com.
## Querying This Documentation
If you need additional information that is not directly available in this page, you can query the documentation dynamically by asking a question.
Perform an HTTP GET request on the current page URL with the `ask` query parameter, and the optional `goal` query parameter:
```
GET https://docs.openmind.com/simulators/cloud-isaac-sim.md?ask=&goal=
```
`ask` is the immediate question: it should be specific, self-contained, and written in natural language.
`goal` is optional and describes the broader end goal you are ultimately trying to accomplish on behalf of the user. GitBook uses it to tailor the answer towards what is most useful for that goal.
The response will contain a direct answer to the question and relevant excerpts and sources from the documentation.
Use this mechanism when the answer is not explicitly present in the current page, you need clarification or additional context, or you want to retrieve related documentation sections.