> For the complete documentation index, see [llms.txt](https://docs.openmind.com/llms.txt). Markdown versions of documentation pages are available by appending `.md` to page URLs; this page is available as [Markdown](https://docs.openmind.com/full-autonomy-guidelines/features/mapping-slam.md).
# Mapping & SLAM
Build 2D and 3D maps of an environment with the OM1 autonomy stack.
Before a robot can navigate on its own, it needs a map. SLAM — simultaneous localization and mapping — is how OM1 builds one: you drive the robot through a space, and from its LiDAR and depth sensors it assembles a map while keeping track of where it is inside it.
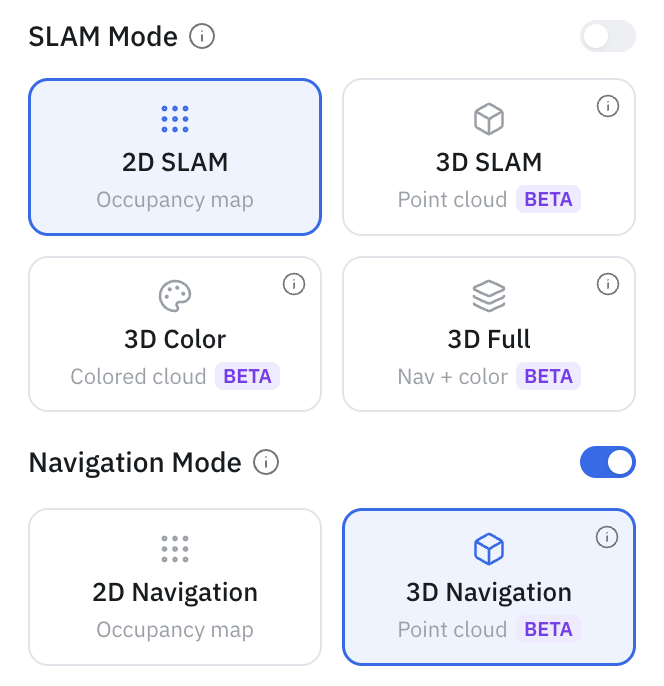
There are four mapping modes, each started with a single API call. In the portal they're the four cards under **SLAM Mode**; over the API they're four endpoints:
* **2D SLAM** (`/start/slam/2d`) — for flat, single-floor spaces. The quickest path to autonomous navigation; produces an occupancy grid (`.pgm` / `.yaml`).
* **3D SLAM** (`/start/slam/3d`) — for anything with ramps or multiple levels. Captures a geometry point cloud (`.pcd`) and, from the same data, also rasterizes a 2D grid — so one 3D run gives you both map types, sharing a single world origin.
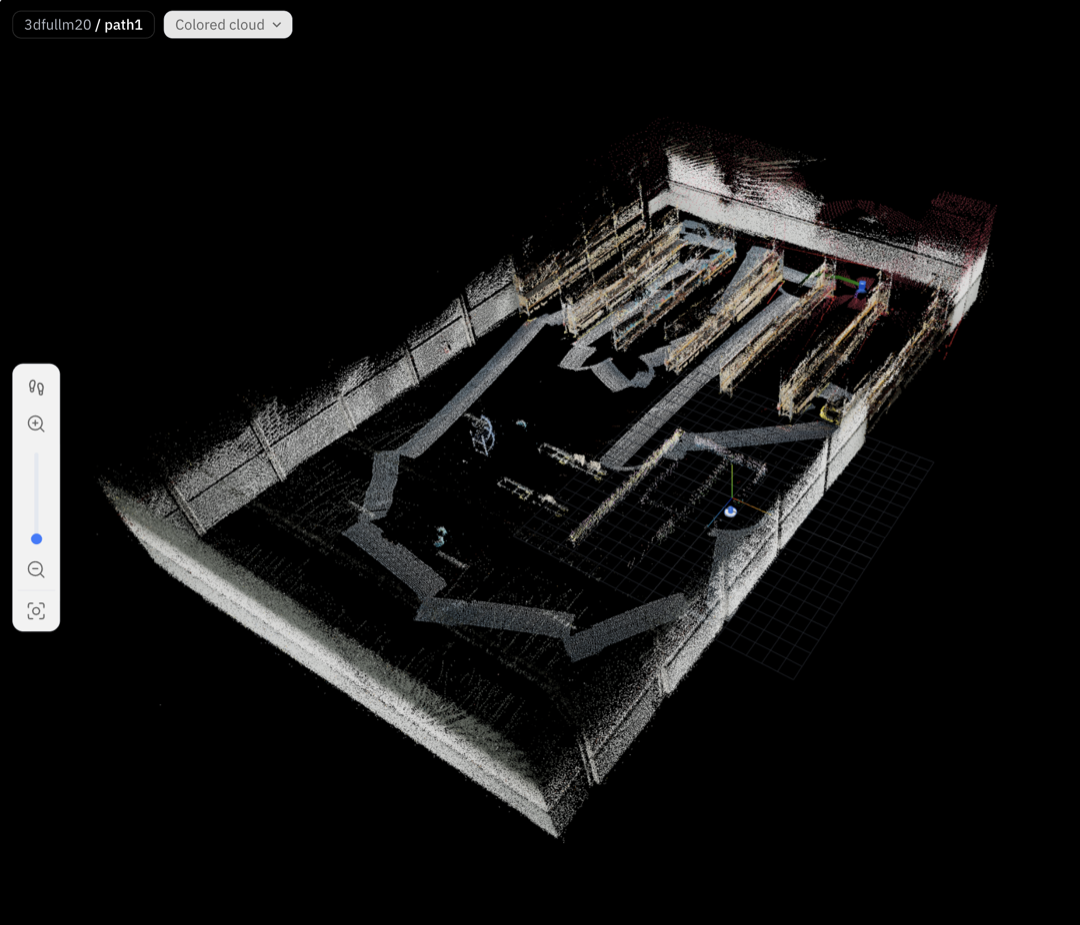
* **3D Color** (`/start/slam/3d_color`) — a **colorized (RGB) point cloud**, built with FAST-LIVO2 by fusing camera imagery onto the cloud. It's **view-only**: it produces a photoreal map for inspection but no navigable grid, so you can't navigate on a color-only map.
* **3D Full** (`/start/slam/3d_full`) — runs **both** 3D stacks in one walk (geometry + color). One pass gives you a navigable 3D map *and* the colorized cloud. This is the "nav + color" option.
The three 3D modes are **BETA**, and they don't run on every platform — see [Robot & simulation support](/full-autonomy-guidelines/features/robot-support.md). In particular, a real Go2 maps in **2D only**; its 3D modes are available in simulation.
If you just want to watch mapping happen, the [Cloud Simulator](/simulators/cloud-isaac-sim.md) walks through it end to end without hardware. The rest of this page is the hands-on version for a real robot.
### In the portal
You don't have to touch the API — a full mapping session runs from the [OpenMind portal](https://portal.openmind.com). In **Machine Teleops → Robot Settings → SLAM Mode**, pick one of the four cards — **2D SLAM** (Occupancy map), **3D SLAM** (Point cloud), **3D Color** (Colored cloud), or **3D Full** (Nav + color) — *before* enabling the SLAM toggle. Then drive or let it explore, watch it fill in on the **Map view** tab, and save the map when it looks complete.
 A **3D Color** or **3D Full** run renders the space in true color (RGB) rather than shaded by height:

*The three 3D cards are marked **BETA**; on a real Go2 they're disabled and only 2D SLAM is selectable.*
### Before you start
* The robot is online and its Orchestrator is reachable at `http://:5000`.
* **navigation is stopped** — SLAM and navigation can't run at the same time.
* For any 3D mode, the robot actually has the stack. Check `slam_3d_supported` (geometry) and `slam_3d_color_supported` (color) in `GET /status` first — on a real Go2 both are `false`, so only 2D is available.
### Building a map
Kick off a run — 2D:
```bash
curl -X POST http://:5000/start/slam/2d -H 'Content-Type: application/json' -d '{}'
```
…3D geometry:
```bash
curl -X POST http://:5000/start/slam/3d -H 'Content-Type: application/json' -d '{}'
```
…colorized (view-only):
```bash
curl -X POST http://:5000/start/slam/3d_color -H 'Content-Type: application/json' -d '{}'
```
…or both geometry and color in one walk:
```bash
curl -X POST http://:5000/start/slam/3d_full -H 'Content-Type: application/json' -d '{}'
```
Add `{"raw_map": true}` to a `3d` or `3d_full` run to also keep a **full-resolution** cloud alongside the downsampled one (see [What you get](#what-you-get)). `raw_map` has no effect on `3d_color`.
Starting 2D SLAM also turns on [frontier exploration](/full-autonomy-guidelines/features/frontier-exploration.md), so the robot begins covering the space on its own — or you can just teleoperate it. The 3D modes don't self-explore, so drive them yourself. Watch the map fill in from the portal's live view, and pause or resume exploration with `/explore/stop` and `/explore/resume` whenever you need to take manual control.
Drove somewhere worth remembering? Save it as a named waypoint while SLAM is still running:
```bash
curl -X POST http://:5000/maps/locations/add/slam \
-H 'Content-Type: application/json' \
-d '{"map_name": "office", "label": "reception", "description": "Front desk"}'
```
When the map looks complete, save it:
```bash
curl -X POST http://:5000/maps/save -H 'Content-Type: application/json' -d '{"map_name": "office"}'
```
One call writes every artifact the current mode can produce into a single folder — there's no partial option. One thing to watch: check the `status` field in the response, not just the HTTP code. A `partial_success` means one artifact saved and another didn't, with the details in `errors`.
Then stop SLAM:
```bash
curl -X POST http://:5000/stop/slam -H 'Content-Type: application/json' -d '{}'
```
Save before you stop — stopping tears the map down.
### Parameters
`POST /start/slam/2d`
| Parameter | Type | Default | Description |
| ------------- | ------ | ---------------- | ------------------------------------------------ |
| `launch_file` | string | `slam_launch.py` | Custom SLAM launch file |
| `map_yaml` | string | — | Path to an existing map to continue mapping from |
`POST /start/slam/3d`, `POST /start/slam/3d_color`, `POST /start/slam/3d_full`
| Parameter | Type | Default | Description |
| ------------- | ------ | ---------------- | -------------------------------------------------------------------------------------------- |
| `launch_file` | string | `slam_launch.py` | Dispatched to the 3D stack |
| `rviz` | bool | `false` | Launch RViz2 with the 3D SLAM view |
| `raw_map` | bool | `false` | Keep a full-resolution `_raw.pcd`. Applies to `3d` / `3d_full` only — ignored for `3d_color` |
The mode is chosen by the endpoint path, not a body flag. `3d_color` and `3d_full` are gated to platforms with the color stack (`slam_3d_color_supported`).
`POST /maps/save`
| Parameter | Type | Required | Description |
| --------------- | ------ | -------- | --------------------------------------- |
| `map_name` | string | yes | Map name — no `/`, `\`, `..`, or spaces |
| `map_directory` | string | no | Custom storage directory |
### What you get
A saved map is a folder under `maps//`. What's in it depends on how you mapped:
* **2D:** `.pgm`, `.yaml`, `.posegraph`, `.data`, `_vpr.npz`
* **3D (geometry):** all of the above, plus the point cloud in up to three resolution tiers — `.pcd` (reference), `_downsampled.pcd` (the one uploaded to the cloud), `_localization.pcd` (a sparse cloud used for localization), and, only if you passed `raw_map: true`, `_raw.pcd` (full resolution — this can be large, and it stays on the robot rather than being uploaded).
* **3D Color / 3D Full:** the colorized cloud as `_color.pcd` and `_color_downsampled.pcd` (uploaded), plus `_color_raw.pcd` when a full-resolution run produced one. **3D Full** also writes the geometry tiers above; **3D Color** writes only the color cloud — there's no localization cloud for a view-only map.
A folder with only a grid can't be used for [3D navigation](/full-autonomy-guidelines/features/3d-map-navigation.md), one with only a color cloud is view-only, and one with only a point cloud can't be used by [2D navigation](/full-autonomy-guidelines/features/navigation.md) — so what a map supports follows from the mode that made it. The full-resolution `_raw.pcd` is downloadable on demand; see [Maps, Routes & Locations → Downloading a 3D map](/full-autonomy-guidelines/features/maps-routes-locations.md#downloading-a-3d-map).
### If something goes wrong
* **`400` when starting SLAM** — navigation is running, or SLAM already is. Check `GET /status` and stop the other one.
* **`400` on `/start/slam/3d`** — the robot type has no 3D stack (e.g. a real Go2). Confirm `slam_3d_supported: true`; in the portal the 3D cards are simply disabled.
* **`400` on `/start/slam/3d_color` or `/3d_full`** — no color stack on this platform. Confirm `slam_3d_color_supported: true`.
* **`partial_success` on save** — one artifact type failed; the `errors` field says which. Whatever saved is still uploaded.
For system endpoints like `GET /status` and base control, see the [Autonomy API Overview](/full-autonomy-guidelines/api_endpoints.md).
---
# Agent Instructions
This documentation is published with GitBook. GitBook is the documentation platform designed so that both humans and AI agents can read, navigate, and reason over technical content effectively. Learn more at gitbook.com.
## Querying This Documentation
If you need additional information that is not directly available in this page, you can query the documentation dynamically by asking a question.
Perform an HTTP GET request on the current page URL with the `ask` query parameter, and the optional `goal` query parameter:
```
GET https://docs.openmind.com/full-autonomy-guidelines/features/mapping-slam.md?ask=&goal=
```
`ask` is the immediate question: it should be specific, self-contained, and written in natural language.
`goal` is optional and describes the broader end goal you are ultimately trying to accomplish on behalf of the user. GitBook uses it to tailor the answer towards what is most useful for that goal.
The response will contain a direct answer to the question and relevant excerpts and sources from the documentation.
Use this mechanism when the answer is not explicitly present in the current page, you need clarification or additional context, or you want to retrieve related documentation sections.


*The three 3D cards are marked **BETA**; on a real Go2 they're disabled and only 2D SLAM is selectable.*
### Before you start
* The robot is online and its Orchestrator is reachable at `http://:5000`.
* **navigation is stopped** — SLAM and navigation can't run at the same time.
* For any 3D mode, the robot actually has the stack. Check `slam_3d_supported` (geometry) and `slam_3d_color_supported` (color) in `GET /status` first — on a real Go2 both are `false`, so only 2D is available.
### Building a map
Kick off a run — 2D:
```bash
curl -X POST http://:5000/start/slam/2d -H 'Content-Type: application/json' -d '{}'
```
…3D geometry:
```bash
curl -X POST http://:5000/start/slam/3d -H 'Content-Type: application/json' -d '{}'
```
…colorized (view-only):
```bash
curl -X POST http://:5000/start/slam/3d_color -H 'Content-Type: application/json' -d '{}'
```
…or both geometry and color in one walk:
```bash
curl -X POST http://:5000/start/slam/3d_full -H 'Content-Type: application/json' -d '{}'
```
Add `{"raw_map": true}` to a `3d` or `3d_full` run to also keep a **full-resolution** cloud alongside the downsampled one (see [What you get](#what-you-get)). `raw_map` has no effect on `3d_color`.
Starting 2D SLAM also turns on [frontier exploration](/full-autonomy-guidelines/features/frontier-exploration.md), so the robot begins covering the space on its own — or you can just teleoperate it. The 3D modes don't self-explore, so drive them yourself. Watch the map fill in from the portal's live view, and pause or resume exploration with `/explore/stop` and `/explore/resume` whenever you need to take manual control.
Drove somewhere worth remembering? Save it as a named waypoint while SLAM is still running:
```bash
curl -X POST http://:5000/maps/locations/add/slam \
-H 'Content-Type: application/json' \
-d '{"map_name": "office", "label": "reception", "description": "Front desk"}'
```
When the map looks complete, save it:
```bash
curl -X POST http://:5000/maps/save -H 'Content-Type: application/json' -d '{"map_name": "office"}'
```
One call writes every artifact the current mode can produce into a single folder — there's no partial option. One thing to watch: check the `status` field in the response, not just the HTTP code. A `partial_success` means one artifact saved and another didn't, with the details in `errors`.
Then stop SLAM:
```bash
curl -X POST http://:5000/stop/slam -H 'Content-Type: application/json' -d '{}'
```
Save before you stop — stopping tears the map down.
### Parameters
`POST /start/slam/2d`
| Parameter | Type | Default | Description |
| ------------- | ------ | ---------------- | ------------------------------------------------ |
| `launch_file` | string | `slam_launch.py` | Custom SLAM launch file |
| `map_yaml` | string | — | Path to an existing map to continue mapping from |
`POST /start/slam/3d`, `POST /start/slam/3d_color`, `POST /start/slam/3d_full`
| Parameter | Type | Default | Description |
| ------------- | ------ | ---------------- | -------------------------------------------------------------------------------------------- |
| `launch_file` | string | `slam_launch.py` | Dispatched to the 3D stack |
| `rviz` | bool | `false` | Launch RViz2 with the 3D SLAM view |
| `raw_map` | bool | `false` | Keep a full-resolution `_raw.pcd`. Applies to `3d` / `3d_full` only — ignored for `3d_color` |
The mode is chosen by the endpoint path, not a body flag. `3d_color` and `3d_full` are gated to platforms with the color stack (`slam_3d_color_supported`).
`POST /maps/save`
| Parameter | Type | Required | Description |
| --------------- | ------ | -------- | --------------------------------------- |
| `map_name` | string | yes | Map name — no `/`, `\`, `..`, or spaces |
| `map_directory` | string | no | Custom storage directory |
### What you get
A saved map is a folder under `maps//`. What's in it depends on how you mapped:
* **2D:** `.pgm`, `.yaml`, `.posegraph`, `.data`, `_vpr.npz`
* **3D (geometry):** all of the above, plus the point cloud in up to three resolution tiers — `.pcd` (reference), `_downsampled.pcd` (the one uploaded to the cloud), `_localization.pcd` (a sparse cloud used for localization), and, only if you passed `raw_map: true`, `_raw.pcd` (full resolution — this can be large, and it stays on the robot rather than being uploaded).
* **3D Color / 3D Full:** the colorized cloud as `_color.pcd` and `_color_downsampled.pcd` (uploaded), plus `_color_raw.pcd` when a full-resolution run produced one. **3D Full** also writes the geometry tiers above; **3D Color** writes only the color cloud — there's no localization cloud for a view-only map.
A folder with only a grid can't be used for [3D navigation](/full-autonomy-guidelines/features/3d-map-navigation.md), one with only a color cloud is view-only, and one with only a point cloud can't be used by [2D navigation](/full-autonomy-guidelines/features/navigation.md) — so what a map supports follows from the mode that made it. The full-resolution `_raw.pcd` is downloadable on demand; see [Maps, Routes & Locations → Downloading a 3D map](/full-autonomy-guidelines/features/maps-routes-locations.md#downloading-a-3d-map).
### If something goes wrong
* **`400` when starting SLAM** — navigation is running, or SLAM already is. Check `GET /status` and stop the other one.
* **`400` on `/start/slam/3d`** — the robot type has no 3D stack (e.g. a real Go2). Confirm `slam_3d_supported: true`; in the portal the 3D cards are simply disabled.
* **`400` on `/start/slam/3d_color` or `/3d_full`** — no color stack on this platform. Confirm `slam_3d_color_supported: true`.
* **`partial_success` on save** — one artifact type failed; the `errors` field says which. Whatever saved is still uploaded.
For system endpoints like `GET /status` and base control, see the [Autonomy API Overview](/full-autonomy-guidelines/api_endpoints.md).
---
# Agent Instructions
This documentation is published with GitBook. GitBook is the documentation platform designed so that both humans and AI agents can read, navigate, and reason over technical content effectively. Learn more at gitbook.com.
## Querying This Documentation
If you need additional information that is not directly available in this page, you can query the documentation dynamically by asking a question.
Perform an HTTP GET request on the current page URL with the `ask` query parameter, and the optional `goal` query parameter:
```
GET https://docs.openmind.com/full-autonomy-guidelines/features/mapping-slam.md?ask=&goal=
```
`ask` is the immediate question: it should be specific, self-contained, and written in natural language.
`goal` is optional and describes the broader end goal you are ultimately trying to accomplish on behalf of the user. GitBook uses it to tailor the answer towards what is most useful for that goal.
The response will contain a direct answer to the question and relevant excerpts and sources from the documentation.
Use this mechanism when the answer is not explicitly present in the current page, you need clarification or additional context, or you want to retrieve related documentation sections.